RUNES


By Aquiantus & Nigedo

It appears that there are two different forms of Dwemeri writing.

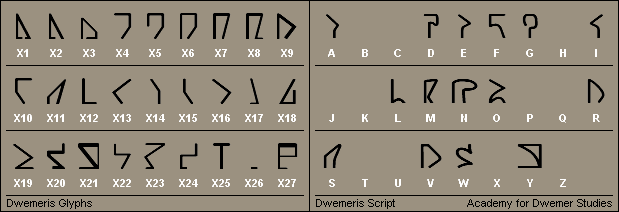
Many good examples of the first type, which we call 'Dwemeris Glyphs' for easy reference, have been discovered in both Morrowind and Hammerfell. These are the runes that make up the famous texts 'The Egg of Time' and 'Divine Metaphysics' (see the link to BOOKS below).

The second type has so far been found only in Morrowind and can be seen upon pipes and fixtures in ruins across Vvardenfell. We call this collection of runes 'Dwemeris Script'.

If a relationship exists between these two types of runes, it is still not understood and research into linking them continues. The glyphs have so far withstood all but the most surface attempts at interpretation and the chart below continues to detail the index system created by Aquiantus.

However, we have been fortunate enough to translate the available Script runes, by examining them in isolation. Lord Divayth Fyr, Telvanni Magister and scholar, has kindly verified that their meanings are exactly as shown below. It is clear that Lord Fyr has access to a greater range of examples of this Script since he also allowed us to learn the rune that represents the Tamrielic "F", which we would not have been able to do otherwise.

Download the 'Dwemeris' TTF font (v1.0) zip file. Includes all of the runes shown in the chart above.
Click To Download 'DWEMERIS' FONT Click To Download
BOOKS
View the pages from 'The Egg of Time' and 'Divine Metaphysics' and access resources for translating them.
Click To Enlarge
Click To Enlarge
Pictures 1 and 2 (see left) are the only examples of Dwemeris Script available to us.

Picture 1 is a tribute to a deeply loved ancestor. This inscription can be found at only a couple of sites while Picture 2 appears to be a hallmark denoting the forge that supplied all Vvardenfell settlements with their steam pipes.
The pictures below are examples of locations and objects displaying Dwemeris glyphs. They are taken from ruins in Morrowind (MW) and Hammerfell (HF). (Most of the pictures can be enlarged for closer study.)
Click To Enlarge
(MW & HF) Features the sequence of runes
X15 (Ritual)
X5 (Shadow)
X7 (Lady)
X9 (Golem)

The names in parentheses refer to the constellations signified by these runes in the Stros M'Kai observatory.
Click To Enlarge
(MW & HF) Repeats the vertical sequence X15, X5, X7, X9 but includes X20.

These are also the first five most prominant runes on the robes of the Lord in the wall hanging representing that constellation.
Click To Enlarge
(HF) A floor boss that shows the same sequence of runes as Pics 3 and 4.

X15X15
X5
X7
X9X9
Two more examples of the four runes shown in Pics 3, 4 and 5.

Pic 6 (MW) shows the same sequence on limeware cups.

Pic 7 (HF) shows a similar pattern on doors at ruins on Stros M'Kai.
Click To Enlarge
(HF) See Pic 9.
(MW) Architectural emblem.

Pic 8 shows the same syle of emblem found in Hammerfell.

X7X17
X7
Click To Enlarge Click To Enlarge
(HF) Panels taken from a huge broken golem found in ruins on Stros M'Kai.

Pic 10
X18, X23, X17, X22

Pic 11
X2, X19, X24, X21, X23
Click To Enlarge
(HF) Golem panel.

X2, X23, X21, X24, X22, X18
Click To Enlarge Click To Enlarge
(HF) Golem panels.

Pic 13
X18, X21, X19, X2, X24

Pic 14
X2, X19, X21
(HF) Golem panel.

X23, X18
Click To Enlarge Click To Enlarge Click To Enlarge
Stone covings and trim.

Pic 16 (MW & HF)
X17, X4, MX23, X10, X26

Pic 17 (HF)
MX9, MX27, MX11, MX15, MX24, X2, X26, MX22, MX11

Pic 18 (HF)
X5, X20, X18, X19, X23
Click To Enlarge
(HF) An oscillating machine connected to steam pipes, with 'hands' that rotate slowly.

X7X5X19
X9X11X24
X20X8X21
Click To Enlarge
(HF) The pronunciation of runes marked on the entrance doors to a ruin on Stros M'Kai, which Cyrus the Redguard discovered from studying the rare text of Favoril's 'Book of Dwarven Lore'.

The runes displayed on the left side are
X22X13
X6X19
X11X24

These are mirrored on the right side.